Wonderchat Actions allow users to interact with external apps using simple language.
Overview
WonderChat Actions allows you to create custom actions that enable your AI chatbot to interact with external APIs, making it more dynamic and versatile. This feature is particularly useful for integrating real-time data or triggering specific processes based on user input. This document will guide you through creating, configuring, and utilizing WonderChat Actions, as demonstrated in the image provided.
They work by:
- Translating user requests into API-friendly format
- Choosing the right API call
- Executing the call
- Presenting results in plain language
The main benefit is easier access to information from various apps. Instead of developers creating complex interfaces, they can describe an API to Wonderchat, which then acts as a bridge between users and the service.
How to create a Wonderchat Action
Step 1: Navigating to the Wonderchat Action Menu
- To create a Wonderchat action, select the chatbot of your choice and click on “Edit Chatbot”

- Within the edit chatbot menu, click on the “Actions” tab
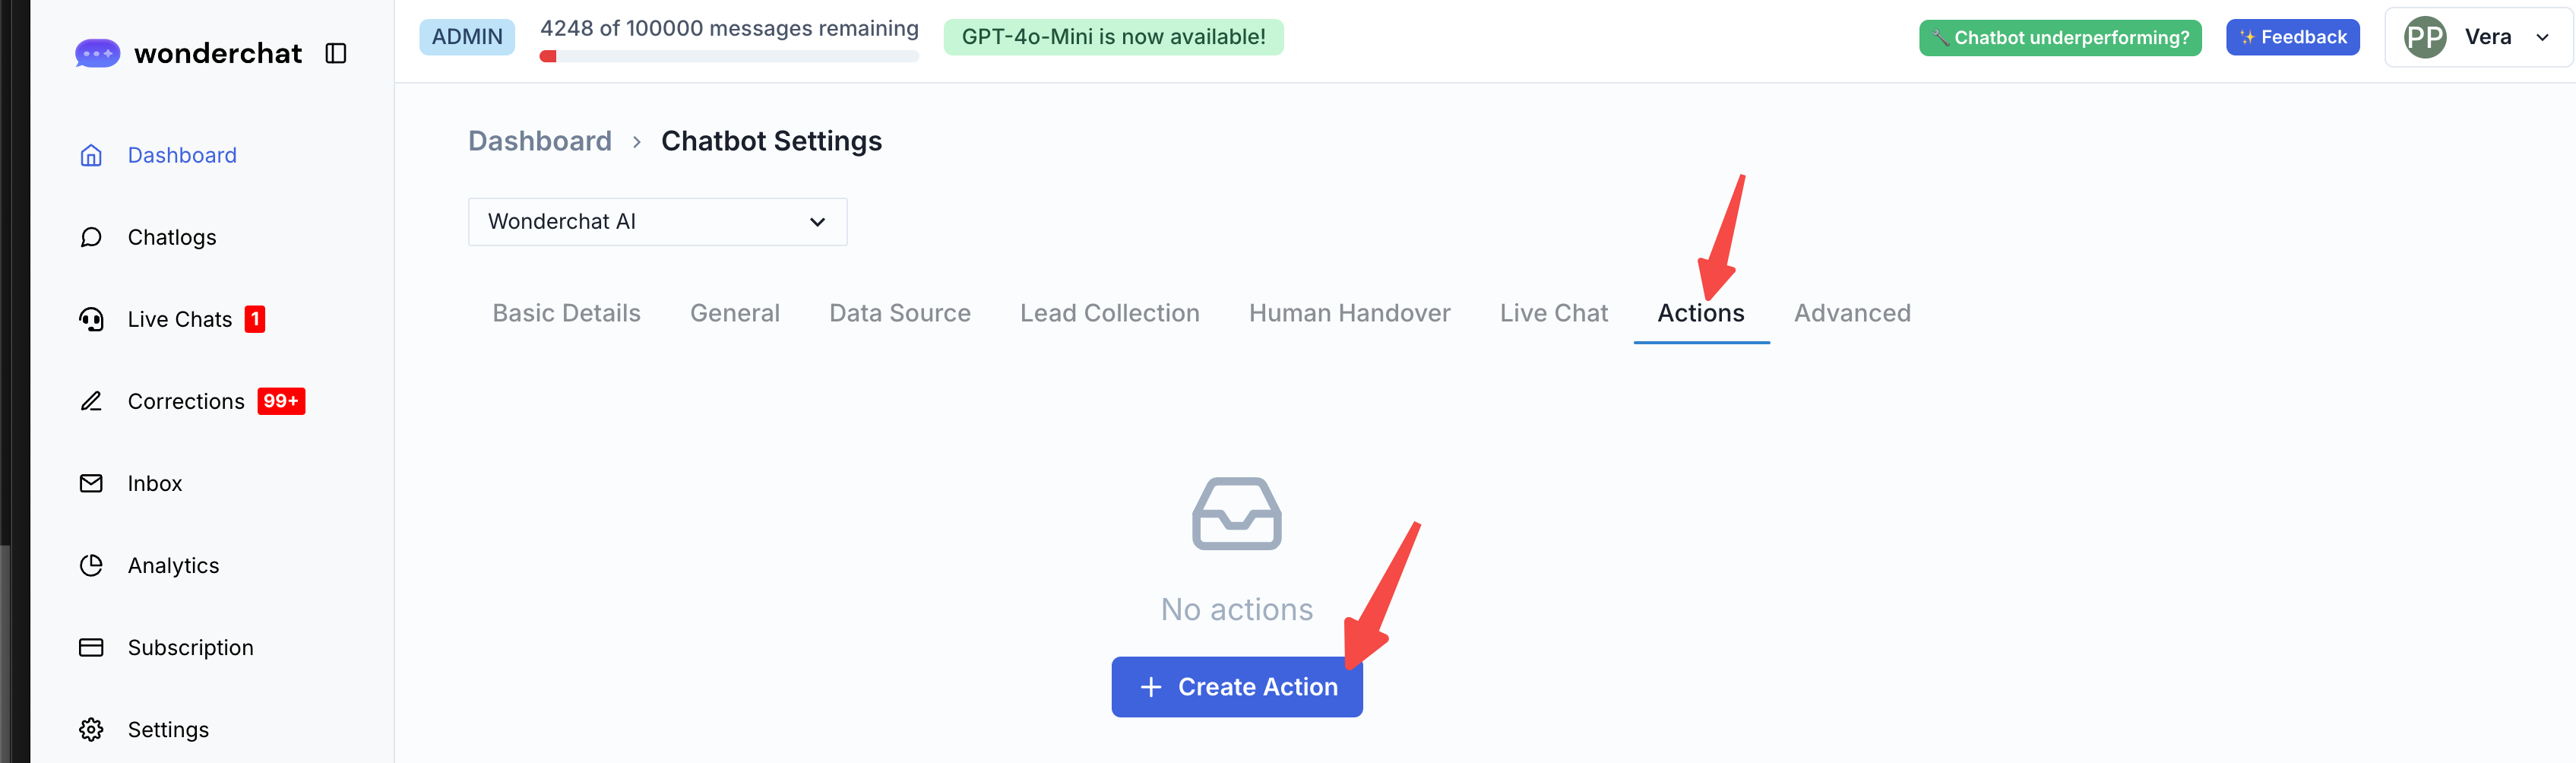
- You will be redirected to the actions page, where you can fill up the missing form fields:
Step 2: Creating a New Action
Once you click on “Create Action”, you will be redirected to the new action menu.
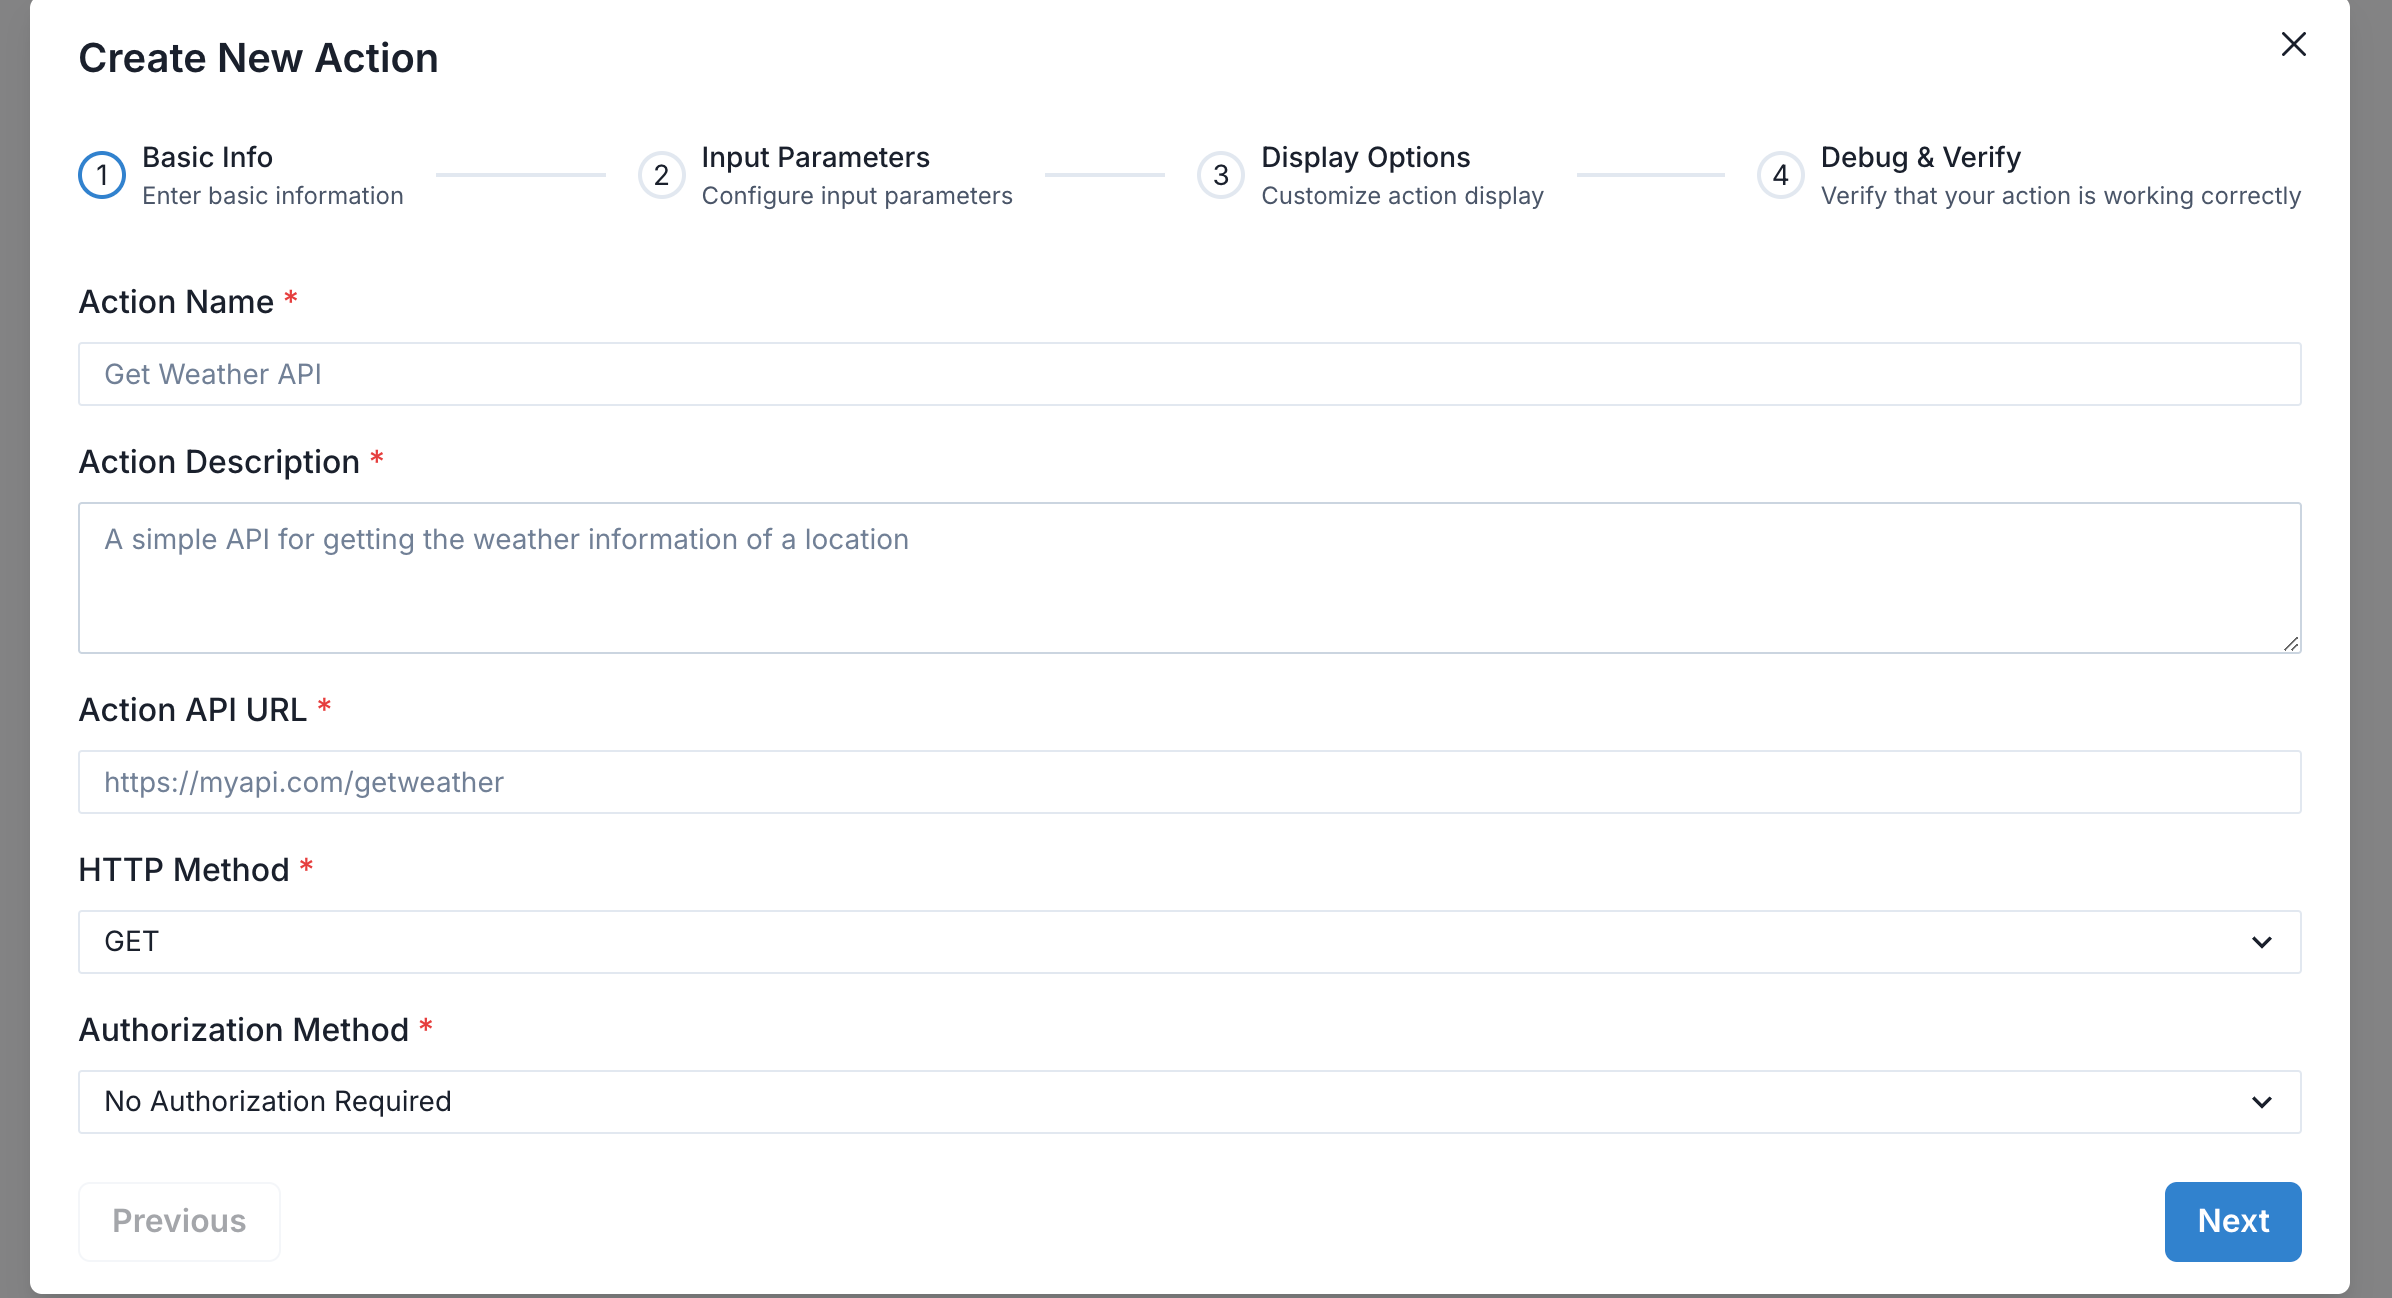
You will then be asked to fill in relevant information to perform the API call.
Step 1: Basic Info
- Action Name:
- Provide a unique name for the action. This name will be used to identify the action within your chatbot's configurations.
- Example:
Get Weather API
- Action Description:
- Write a brief description of what the action does. This description helps you remember the purpose of the action when managing multiple actions.
- Example:
A simple API for getting the weather information of a location.
- Action API URL:
- Enter the URL of the API endpoint that this action will interact with. Ensure the URL is accurate and points to the correct resource.
- Example:
https://myapi.com/getweather
- HTTP Method:
- Select the HTTP method that the action should use when making requests to the API. The available options typically include
GET,POST,PUT,DELETE, etc.
- Example:
GET
- Select the HTTP method that the action should use when making requests to the API. The available options typically include
- Authorization Method:
- Choose the authorization method required to access the API. Options include "No Authorization Required", "API Key", "Bearer Token", etc.
- Example:
No Authorization Required
- If the API requires authorization, additional fields will appear for you to enter the necessary credentials, such as API keys or tokens.
Step 2: Input Parameters
After setting up the basic information, you'll need to define the input parameters for the action.
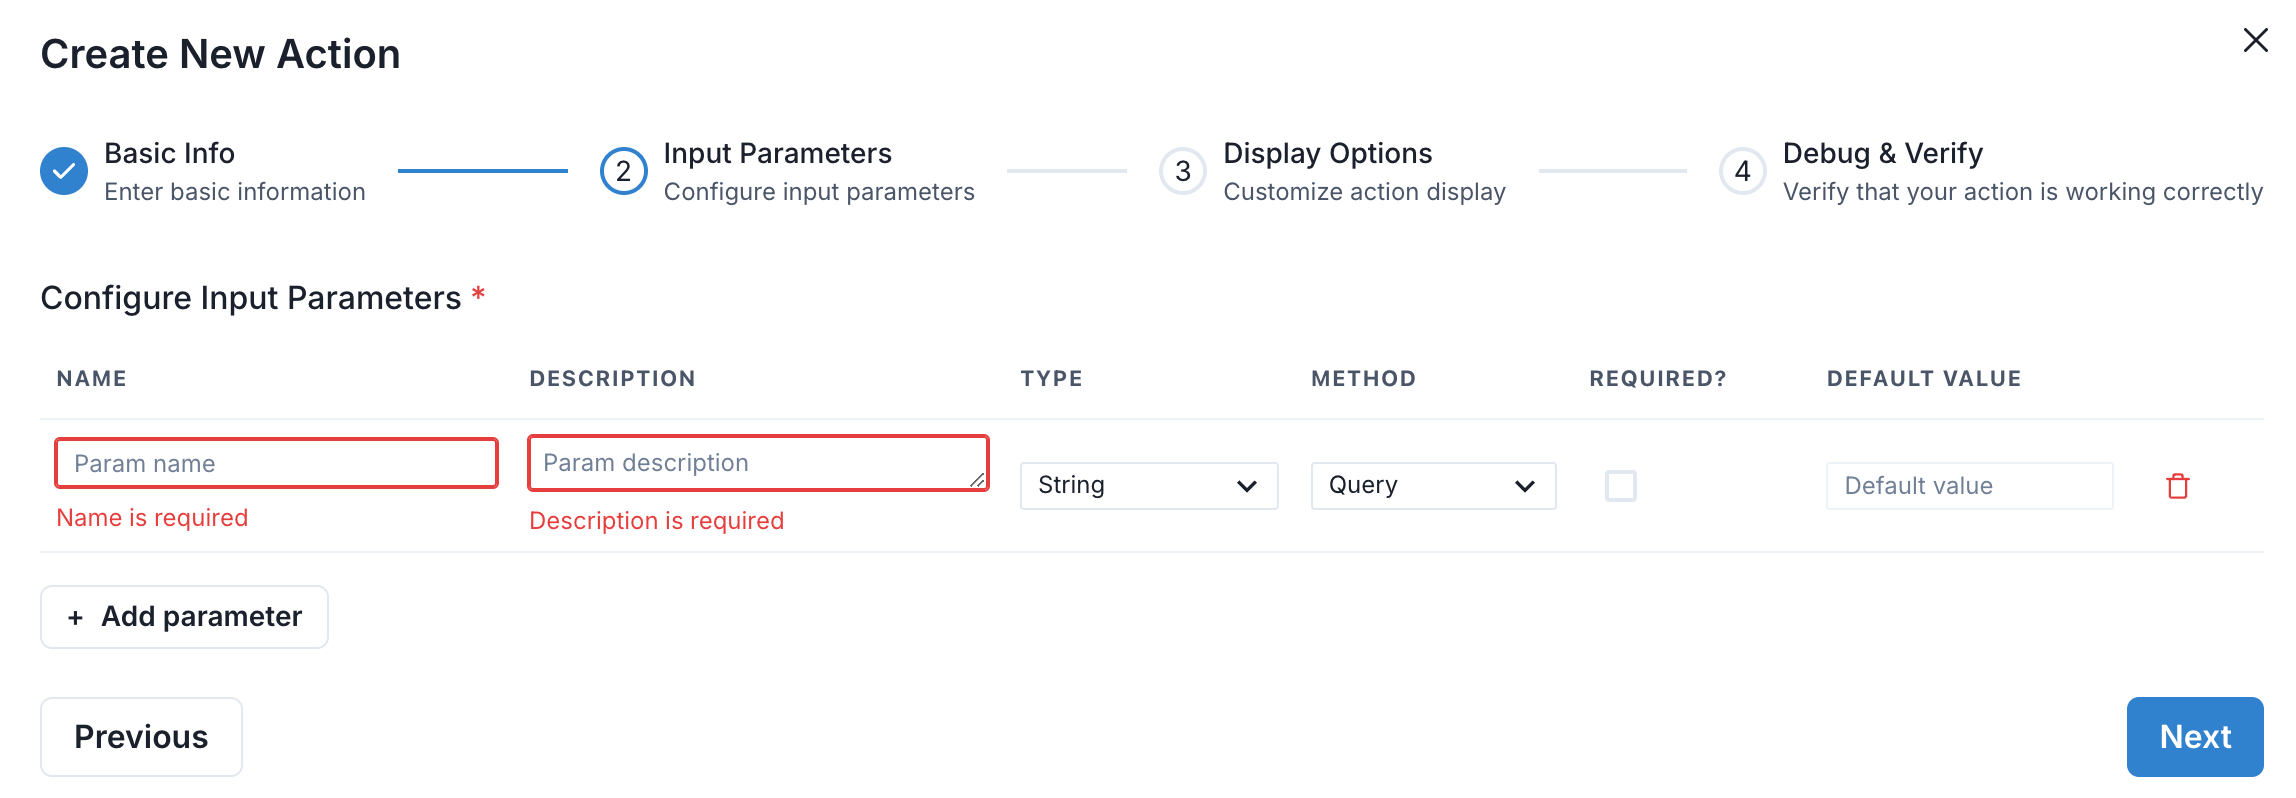
- Parameter Name:
- Define the name of the parameter that the user must provide. For example, if you’re retrieving weather data, a parameter could be
location.
- Define the name of the parameter that the user must provide. For example, if you’re retrieving weather data, a parameter could be
- Parameter Type:
- Specify the type of input expected, such as
string,integer,float, etc.
- Specify the type of input expected, such as
- Required:
- Indicate whether this parameter is mandatory for the API request to be successful.
- Default Value (Optional):
- You can specify a default value for this parameter, which will be used if the user does not provide one.
Step 3: Display Options
In this step, you can customize how the action's output will be displayed to the user.
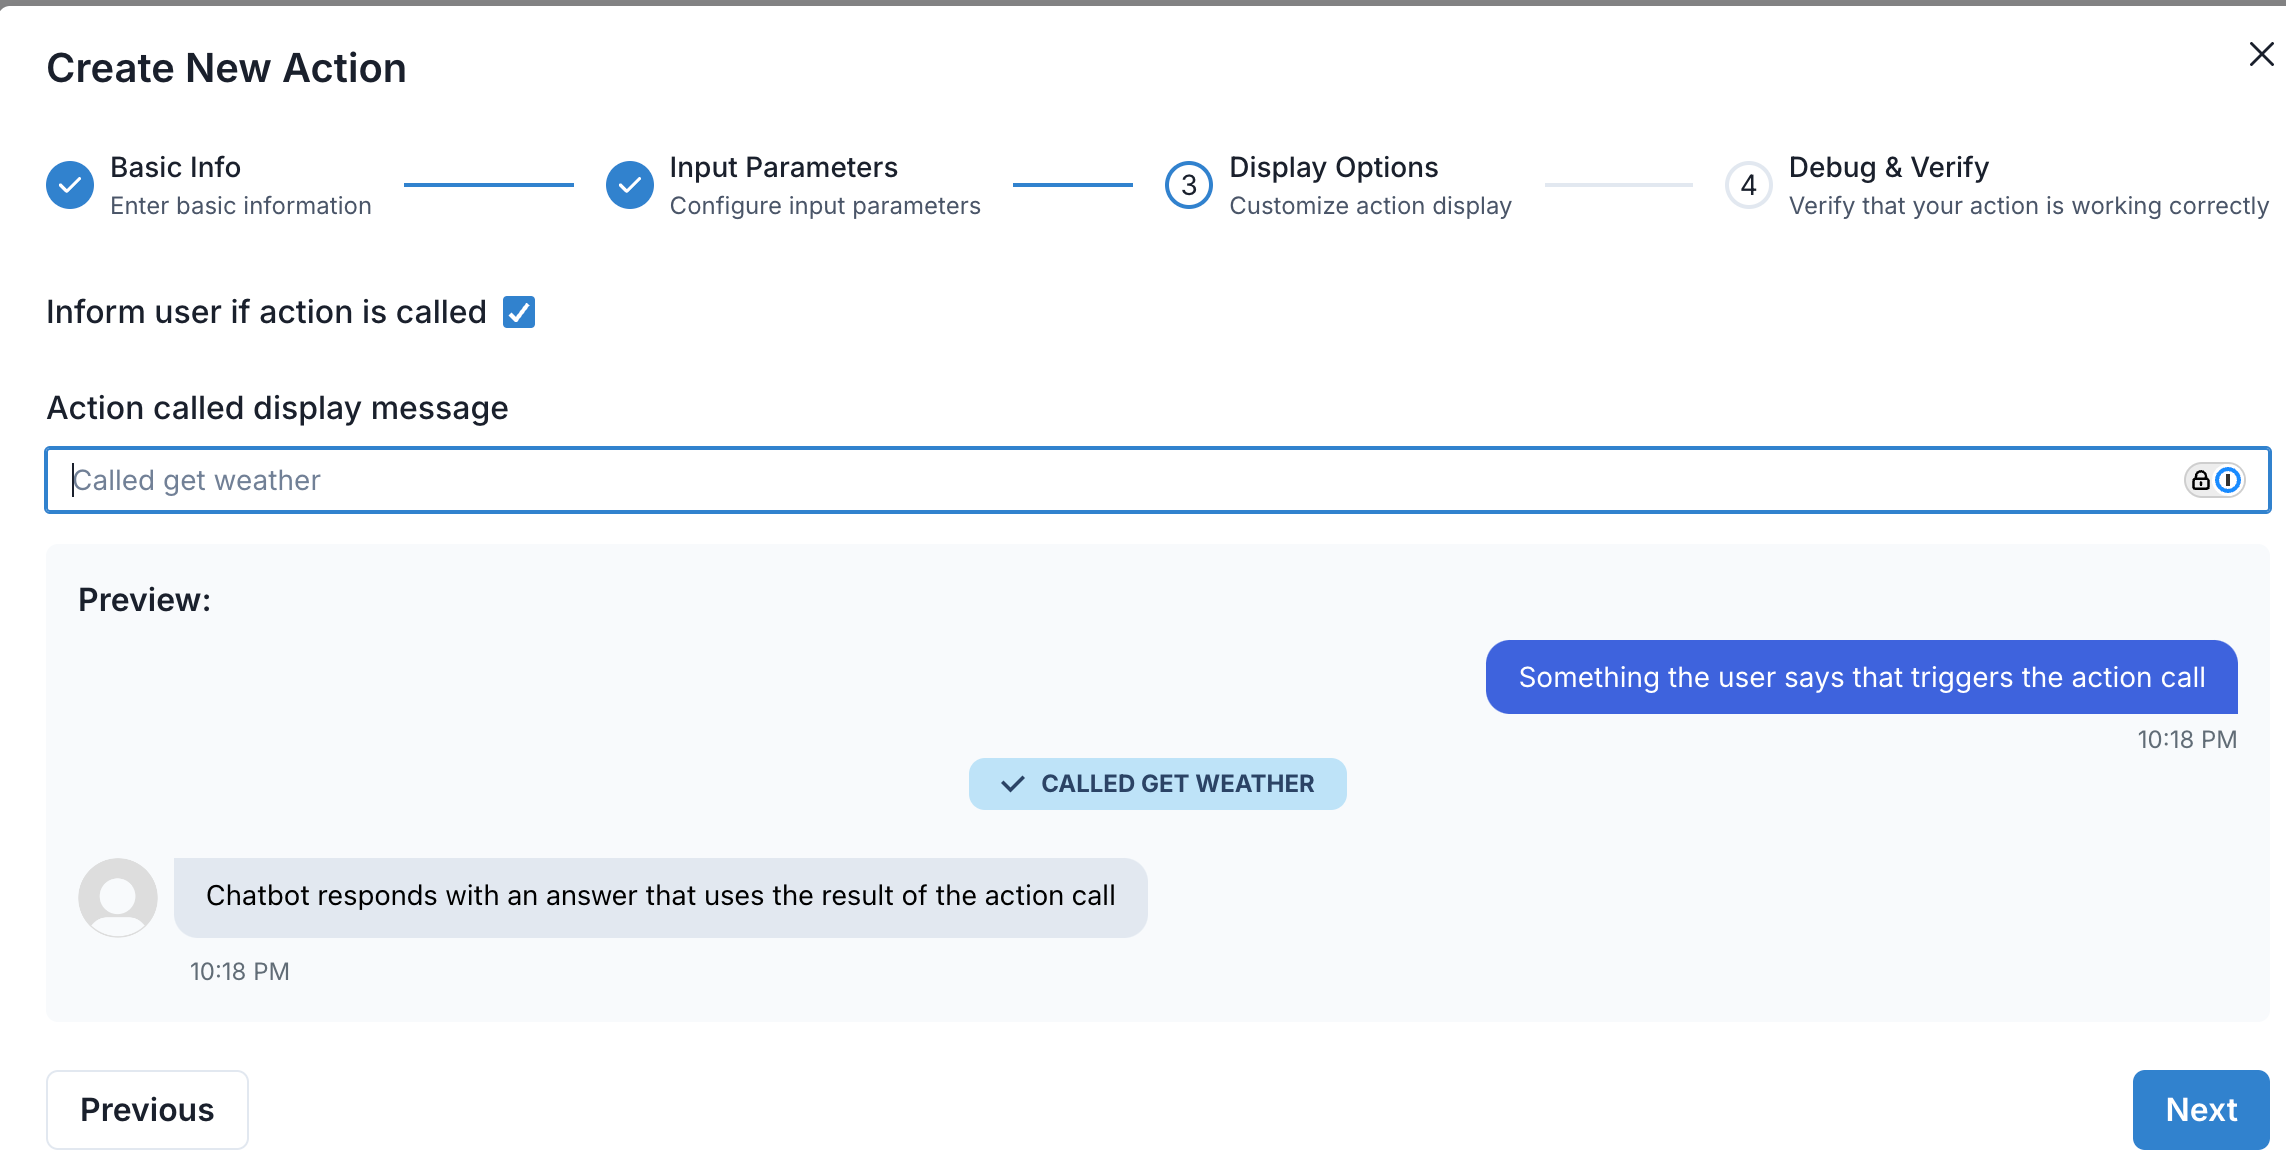
- Inform user if action is called:
- Toggle this button on and off if you want a user to be informed when a Wonderchat Action is called.
- Action called Display Message:
- Choose a name for how this action’s result should be labeled in the user interface.
Step 4: Debug & Verify
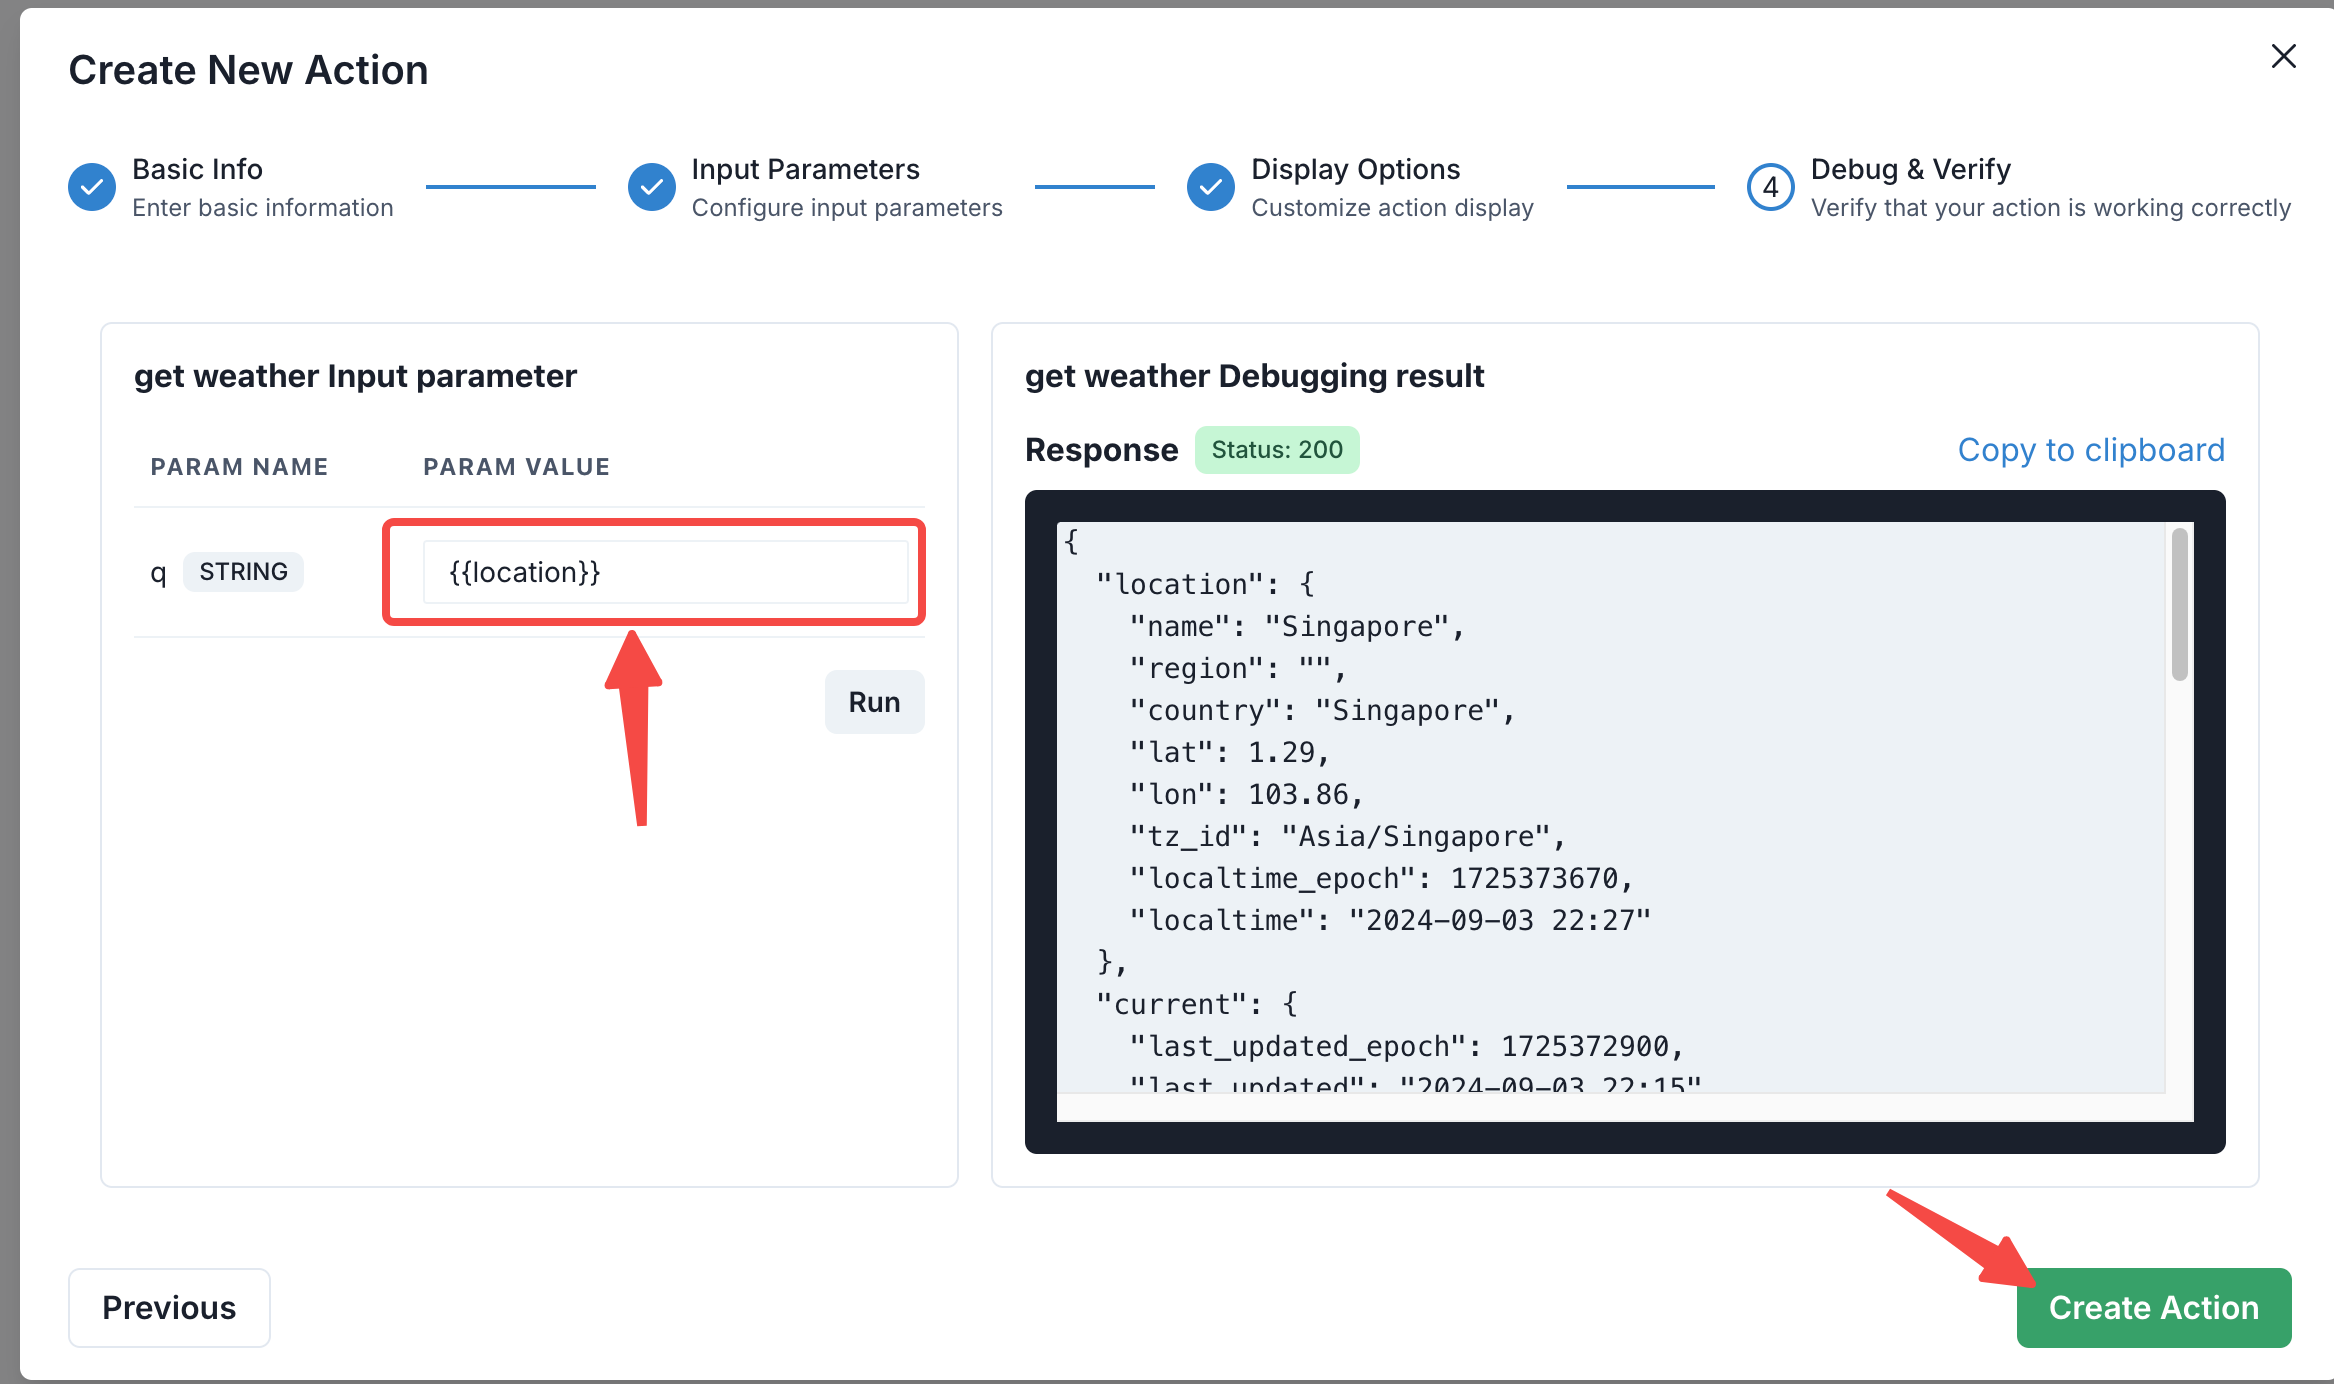
Finally, you can debug and verify that the action works correctly:
- “Run” and Test Action:
- “Run” your inputs to ensure that the action interacts with the API as expected and returns the correct data.
- Review Response:
- Check the API response for any errors or issues, and adjust the action settings if necessary.
- Create Action:
- Once you’ve verified everything is working correctly, save the action. It will then be available for use within your chatbot workflows.
Usage in Chatbot Workflow
Once your action is created, it can be integrated into your chatbot's workflow. You can set triggers for this action based on specific user inputs or events within the chat.
- Triggering the Action: You can configure your chatbot to trigger the action based on user questions or commands.
- Handling the Response: Customize the chatbot’s response to the user based on the data returned by the action.
Example Use Case
Get Weather Information:
- When a user asks, "What's the weather like in Singapore?", the chatbot can trigger the
Get Weather APIaction, pass theSingaporelocation as a parameter, and return the current weather information using the API response.